Sunday, May 9, 2010

First Geology Field Trip - It was a Blast!!!!


Its me in the 2nd day of the trip in the Renyuk Waterfall, Jeli, Kelantan.


It had been a week since my return from my 4 days 3 night geology field trip all the way from Perak, Kelantan to Cameron Highland with A.P Askury and Dr Zuhar, along with several assistance which is very obliging. Basically it was a normal geology field trip that all the geoscientist out there had to go. Studying geological features and rocks through outcrops along the high way.

It Ain't Easy, being a Geologist in Field.
It is not kinda leisure trip which everyone is expecting. The weather is killing me; we spend hours spending under the blazing hot sun which nearly tear my skin apart. Despite that everyone was listening to our professor explaining about geological facts, swiftly taken down all the essence in a handbook. We have some compass and hammers in hand, just like other geologist to aid us in exploring. We also climb over the terrains to collect data (strike and dip of beddings and directions) and some rock samples. And definately photograph, though we are required to sketch each outcrop.

We had gone through cliffs side in highways to study sedimentary rock and igneous rocks, rivers to observe some drainage systems, caves to study limestones and Karstic structure, hot spring, and finally to Cameron highland's famous tea farm to study a few metamorphic rocks. The tea farm site is among the most enjoyable, with breathtaking environment and cool air.

Shitty Experience
What happen if you couldn't find a toilet while your bowel pressure is building up tremendously? You do not even have tissue papers for later cleaning task. So the answer is leaf. Luckily I found a small stream so I had forgotten about leaf. That is not uncommon or taboo while you are off into remote area. Its quite common. 101 survival skills.

Well, not too bad, at least, finally.
It was kinda satisfactory though, after a day of tired expedition with all the precious data and beautiful rock samples from many sites collected as my personal collection. I have produce some artistic sketches of geological outcrops, where I really like it. We had stayed over in some quite nice hotel (except the 1st one in Jeli, Kelantan). The stay is indeed very happening, with good foods and good room. The stay is very different with all my fellow GeoScience course mates. We do have some presentations and discussions with fellow lecturers about the trip of the day during the night. Really learnt a lot.

Beware of your Belonging
My friend nearly lost his precious 4 months old laptop, a 1 day old NEW camera, and an external hard drive: all due to a second of carelessness. He is sitting next to me in the bus while he realised this. He first inform me about this shocking news. This scene still playing vividly in my mind and I feel the anxiety in him as I had observed how his face changes - very dramatical and he nearly cried. Immediately we rushed down to stop the bus and get to ride in Dr Zuhar's car. The driver make a U-turn and after nearly a half an hour road taken through the town, we finally reach back the RnR in the highway, where he left his laptop, camera and hard disk. We ran there and, THANK GOD it is still there after nearly an hour!!! no body takes it. My friend was overjoyed as tears filled his eye. That day we had really learnt a very valuable lessons.

One of my sketches on limestone outcrop, crisscrossed with calcite veins. A rock sample is sketch below with a white vein of calcite.

In front of Gua Ikan, Kelantan

In front of Gua Ikan. From left: Robert, Ayu, Ruth, Aina, me, Kevin, Ee Juan, Ah Kok, Zaid, Mark and Amrith.

Listening to Dr Zuhar's explanation. This is in the 1st day.

Thursday, April 22, 2010

My 1st Mouse Driven Digital Painting!!!

To date, this is my most superb artwork ever, which is also quite unexpected .
Everything here was hand-drawn, and digitally painted, including the background, without any references. The concept art of Mutalisk are of my very own idea.
All works are done solely by mouse.

I had never realized that Photoshop could be complemented with my drawing and painting skills so well that, it pushes me way beyond my normal limit! I had discovered myself many methods of painting in Photoshop, which is quite easy, effective and versatile. Though in the industry Corel paint is more well-known, as a freelancer Photoshop could be simply more than sufficient and user-friendly. You can still do well even without a drawing tablet.


Well, back to my paintings of Mutalisk, I would show you guys step by step how it was done. =)


I have drawn a Starcraft Mutalisk in a piece of paper (long time ago During a boring talk session in PLKN), and decided to colour it using Photoshop recently when I found that 2 years-old drawing. Therefore I have capture it with my K770i SE camera with low resolution, and that brings the drawing to stage 1 as follows:


_______________________________________________________________________________
STAGE 1 - Sketch

This is the enhanced version of the camera image. I use Photoshop to contrast the background and the lines of drawing, and make it clean. It looks almost original.


_______________________________________________________________________________
STAGE 2 - Colour


As you can see basic colour is being filled into the a white "background layer". I have the original layer topped to the highest layer as "cover layer", with layer blending mode "multiply"


_______________________________________________________________________________
STAGE 3 - Toning

Once the base colour is being filled, more or less like the traditional painting, we begin to detail out the toning of the colour, with an imaginary light source. In Photoshop, the tools involved are "Burn" and "Dodge" tool. I start to tone the muscles and carapace to make them more defined.


_______________________________________________________________________________
STAGE 4 - Texturing


To make this Mutalisk look lively, I start to work on its texture, such as the muscle fibers, grunges and scratches in the carapace, blood vessels in its wings, etc. The textures are very fine and some are only visible when you zoom in. (click on the image to enlarge) The technique invole is also normal painting and toning to create the textures.


_______________________________________________________________________________
STAGE 5 - Reflections


Minor reflections is added to give the carapace and muscle look even realistic. Notice that the dark are also having thin white reflections as lining.


_______________________________________________________________________________
STAGE 6 - Finalizing and Cleaning Ups


At this stage it is sufficiently considered as completed. Change a little bit of the hue and saturations of the colour and sharpening all the edges which are initially blurry with pencils grunges.


_______________________________________________________________________________
STAGE 7 - Backgrounding


Finally I have decided to add a suitable background to this Starcraft creature. The backdrop which I had painted features the 2 moons of Mar Sara (a fictional planet in the Starcraft Universe.), as the Mutalisk roamed veraciously in across its atmosphere in high altitude, which subject the the Confederate's aircrafts in constant fear.


Monday, April 5, 2010

Retire from Events!!!

All the while my semesters had been very hectic. Apart from the "mandatory" academic schedules, my time is fully packed with events which I had joined (as organizing committee, not participant or delegate), such as EDX, SPE, CONVOFIAR, CHILDPRO, OCM, TOASTMASTER, CASFUMAL, ICC, etc. I went to meetings almost everyday, even until 12.00am. My life is full of schedules which had grabbed off most of my free time. Yea I do admit that organizing events are beneficial, but overdoing it is really unwise.

Well after reflecting deeply, I had made my crucial decision - I already had enough experience and moments to be treasured while organizing events and now its time for me to retire for the very next sem!!! Though I had been offered numerous posts in many events incluing HODs, even PD and APD, I had reluctantly rejected all of them. I am just a simple person who yearn for a simple but meaningful life. I want a peacful, slow-paced life with good quality:

Weekdays:
-study and do revision with own sweet time
-study with my EE friends everyday in common room (miss that)
-doing crazy stuffs with crazy peeps like Branson, Feng Jie, Andy, Alex, etc
-swimming is a MUST, jogging, workouts during evening
-cook good food (and they taste heavenly tasty after sport!)
-online and play some PC game before sleep


Weekends
-study whole day until tired and bored
-then go for sport to "unleash the boredom!"
-or play my violin, drawing and producing some artwork which I really enjoy
-and sometimes Sunday evening is a hangkai-movie-swimming-eatouts day in Ipoh!


We live uni life only once, and when we step out of the campus upon graduation to work, we'll again face the hectic life where you once had had before in uni. And this time it is until you retire. So why wanna make my life miserable by organizing too many events? Control yourself, Wei Di. Don't be too naive and blinded by the posts offered; those are just workloads that burden your life if you don't like it.

People might say that by organizing events you can learn to lead people, carried out task efficiently and it helped you when you stepped out there to work. Yea it is true but I am simply different. I am a person that is ignited only by passion and duty. Now I see my passion in joining events is dying rapidly so I can't afford to join anymore as that would results in irresponsibilities in me after joining. I can't anymore give out much commitment as last time as I did. I realized that I had changed. But when come out to work its different, because its my main responsibility and I will do whatever I can to please the one that pay me salary. (I am kinda $$-orientated)

Anyway do not follow what I said, as different people have different way of life. Some people simply enjoy to be an organizing committee, while some don't. I am just sounding out my personal feelings.

Monday, March 29, 2010

Tears of Mother Nature (Poem)

Tears of Mother Nature

The rain's falling like a million feathers;
with gentle rhythms sounds sweet to the ear.

The sky is echoed with rolling thunders,
with friendly voices of Mother Nature.

The air is fresh and ground filled with waters,
with aroma and essence that wets the summer.

Its the moment She nurture Her creatures,
with love and care that shower with her tears!


By Wei Di
29/03/2010

Monday, March 15, 2010

Making a Map for Warcraft III - an Overview

People really having much fun playing Warcraft Maps (such as DotA, The Three Corridors, Fight of Characters) but did anyone know how these Maps are created? As a Map maker, I am gonna explain a lil bit here so you guys could appreciate what people has done for you to play!

Well, to create a good map (game) with many original customizations, it is indeed a tedious project:

-it requires you a knowledge in programming (Jass script), or at least, basically, in GUI
-a knowledge in graphics editting (2D for Icons, textures, etc and 3D for models)
-a knowledge in sound editting (but doesn't seems popular among the community)
-a knowledge in terrianing
-AND good knowledge in gaming of course!


Scripting:
There are 2 methods where you can write your triggers:
*(triggers are the procedural codes that would be automatically be executed in response to certain events or happenings)

1)The GUIs (Graphical User Interface) for beginners- but has limited functions, and
2)The Jass Script- very powerful but need an advance knowledge in programming.

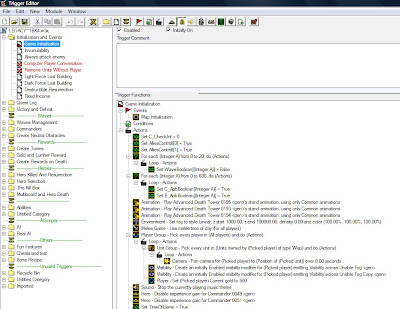
Therefore, I prefer the GUI method since I have not undergone any proper training in programming. All my knowledge is self-explored (since I have no internet during form 4 and therefore no web-based learning). Below is an example taken from a map that I have created during Form 4 (Legacy of the Damn):


A piece of trigger Written in GUI - simple. However if you did it beyond limits, it would be very messy, especially when you are dealing with 2 dimensional array variables.


Jass Scripts - I see stars!! Well it is very messy to untrained eyes, but would be very neat for pros as you can create variables of type both "local" and "global". So it is very powerful and have almost unlimited functions.


Texturing and Modeling:
This is another aspects of map making, where it enhances the art effects of the game. It requires you to a skill in
1) 2D graphic edittings - Photoshop to do texturing, Icons, LoadScreen, with alpha channel
2) 3D Graphic editting - 3D Max (Modelling, Animations, Particles, etc)

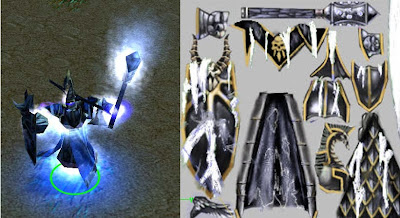
I am good in 2D Graphic editting, since my 3D skills is for LightWave and SketchUp, not 3D Max. Anyhow I do know some simple 3D editting for Warcraft III model. Well I gonna show you the 2 models (out of many) that I have customized in my map (Legacy of the Damn)

Left: My first editted model (Fozeron) , editted originally from the in-game LightningRevenat model. I had added some icy particles with the particle emitter. Right: The texture that I editted. Added a thin layer of snowy ice so make it look chilled.


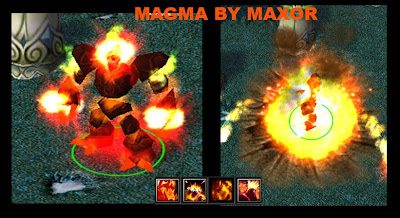
Another Hero I edited. I change its particle colour from green to red, then add some flame effects on its head and hands. So the whole infernal is really ignited! The 4 icons below are his spells I programmed in GUIs (including art effetcs). The 2nd and 3rd icon is drawn by me using Photoshop. The right image showing Magma casting Lava Splash (3rd Icon).

Terrain Editting
Well this is another knowledge you need to have in Map-Making. But it is simple to create the terrain with the terrain editor in World Edit. Most people found it easy to master, however, if you are not a good artist, the map would look very fake and not natural. So its all instinct and intuition that u are dealing with! A map that is too empty or crowded is not good.


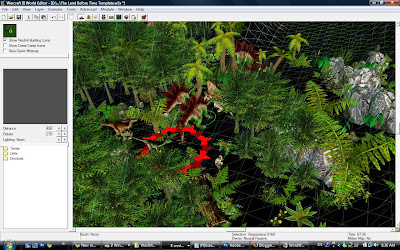
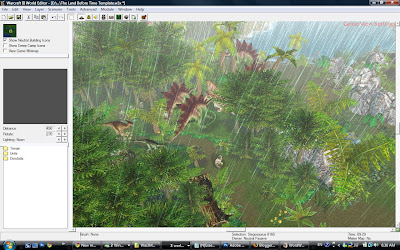
Another map of mine - the Jurassic Survivor.
Upper: A texture Wire-framed terrain.
Below: Rendered in-game previews, where I added in linear fogs, rain effects, and did all the terraining myself. Imported models including Dinosaurs, araucacia trees, palm trees, fern trees, grass, etc.


Sound Editting
Well most map-maker don't use custom sound for sound effects, since there are pretty much in-game sounds in the game's directory readily to be used. However if you chose to, it is another advance knowledge in MIDI editting! Though I do composed a few theme song for my map using Sibellious, but the file is too large for it to fit in. Plus, it is not so nice also. So I just simply download some track and put it in my map.


Well, I would say that making a truely genuine map with high quality is quite a tedious project. For me, where my modding team consist of only my brother and I, so the modding (modifying) process seems endless! (Plus I cant find any other map makers in Malaysia). Stuff goes even harder for me since my house have no internet connections that time; it also means that I had to learned the whole modding process through myself - explore exsisting maps, try and error, experimets!!! And mighty good thing I made it all!

Now I have stop modding map and whatever I wrote here is just for some general knowlegde that I wanna reminisce and share with all the gamers. =) Someday, maybe in the holiday I would continue to complete all the map that I have made halfway. (Legacy of the Damn, Farmville, Pro Shooter, Underwater, Jurassic Survivor, etc)

Sunday, February 14, 2010

Photoshop Tutorial #1: 3D Sphere in 5 Minutes!

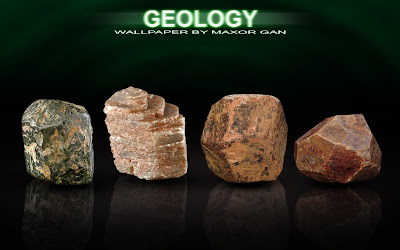
Wallpaper of the day - Only 4 source images is used (the left 2 corundums and right 2 garnets).
The rest I did it manually in Photoshop, after discovering the technique of creating spheres
with shadows and reflection.


For most people, Photoshop is an image editing software where you combine 1 or more source images (photos, stock images, pictures from internet, etc), modify them, add in information and make them into a new piece of image. Or many people prefer to use Photoshop to retouch photos.

But now I gonna teach you to go beyond what other people normally do. I'll show you how to create images instead of modifying, and here is the 1st tutorial, one of the simplest.


TUTORIAL 1
3D sphere in 5 minute. Sound kinda impossible? I'm gonna unveil the mystery layers by layers so for those who are still new you'll know what is going on with the "Layer" feature in Photoshop, a very powerful gifts in graphic designing. There is no 3D functions, preset filters, or add-ons involved.

STEP 1
Not big deal. Create a grey circle like this. There are many ways to create a circle. I prefer to use the Pen Tool to create shape.

STEP 2
Now make it 3D. How?
This is the tricky part. You need to add tones to the plain circle using your mouse. I do recommend you to use the Dodge and Burn tool. Dodge is to lighten it while Burn is to darken it. The upper part should be brighter as light if reflected and the lower part, darker. To make it more realistic add a little reflection at the edge near the ground. Step 2 would just be a piece of cake if you are talented. =)
STEP 3
Now its time to add shadow. We add it manually.
Create a feathered-edge black circle. For me, I use the Brush Tool with large diameter and 0% hardness. And dot one on the canvas. Then proceed to transform it (CTRL + T). Compress the feathered circle into oval shape.

STEP 4
Place the shadow behind the ball so it look like this. Adjust it till it is right at the bottom of the ball. You are not done yet anyway, only for the 3D part. For skilled people this takes only 30 seconds. (by aids of shortcut keys, of course)

STEP 5
Copy and paste the 3D sphere layer so you have 2 layers (CTRL + J). Transform and flip the copied sphere vertically (along the x-axis) so it resembles the mirror image of the 1st sphere (Edit->Transform->Flip Vertical). Then adjust its position till they touch end to end at the bottom. Use Eraser tool (E) to fade the bottom part of the reflected sphere with uniform gradient. The eraser should be feathered, i.e. 0% hardness. Tada...you are done! Congratulations. Wait a second, maybe you want it to look metallic instead of a gypsum plaster?
STEP 6
Now get a source image. In this case I have took a picture. (Chancellor Complex of University of Technology Petronas) This photo would gonna be the reflected environment in the sphere. DONT use your photo else you wanna see how funny your face got distorted! xD
Use the liquefy filter to make it appear reflected on a spherical surface. (though I prefer to use warp transform) Then crop out the part. Place the cropped image behind the sphere. Then apply Linear Light mode to the Sphere layer so it looks like this. Repeat the same thing for its reflection and you are done!


DISCLAIMER.
I shall notify that all tutorials and materials that had been used here are very original. No other tutorials from other sites is pasted, nor referred. Every ideas are original.


Thursday, January 28, 2010

"Cat"astrophe.

I woke up some 6am n feel some warm furry thingy near my leg. To my big surprise I come to realise that I have actually slept with a cat for the whole night! (ntg happen between us btw) Naturally I grab the nearest tool (broom) and whack it hard...chasing after it. It run real fast. But my anger drove me even faster. Until we reached the balcony where it's the dead end. Thx God I was conscious enuf 2 let it survived. BTW I casted my ulti - pour it with a big pail of water. It then drifted skillfully off the corridor like AE86.

Rocks Collection

Rocks Collection
Rocks collected since I was young...

Uni Mates!

Uni Mates!
A picture mosaics of of V6 residents in year 2008.

LinkWithin

Related Posts with Thumbnails